

I know this is not the most daunting of tasks but I've had to help three of my friends do it now, soooo since I have a new toy with a V1 I figured I'd do a write up on it.
List of supplies you will need:
1. Boost gauge
2. Light for gauge
3. Vacuum line
4. Vacuum T
5. Vacuum line connector
6. Drill
7. Grommet
8. Black 14 gauge wire
9. White 14 gauge wire
10. Weatherproof butt connectors (for 14 gauge wire)
11. Wire cutters
12. Needle nose pliers
13. Wire strippers
14. Crimping tool
15. Pillar gauge pod
16. Teflon tape
17. Add a fuse connector
![Image]()
1. Remove stock pillar
![Image]()
2. Fish black and white wires through edge of dash, about 4 feet of black and 2 feet of white
![Image]()
3. Put ends of light and new black and white wires in the butt connector and crimp (top side of dash)
![Image]()
4. Now heat the shrink on the connector for a good seal
![Image]()
5. You can now test you connection with a 9V battery, so if you have an issue later you know that it's not from here. at this point take the white wire, connect with butt connector to the add a fuse connector and place it in a spot that is only on with your ignition or switch or a switch on. i used the headlight switch so the light will work with the dimmer switch (sorry, forgot to take a picture of this)
![Image]()
6. Fish the vacuum line through the dash like you did with the previous wires, but sine the line is in a permanent curl position, it is easier to fish a piece of wire through then tape the ends of the wire and vacuum line together and pull the line through
![Image]()
7. Now you should have the two wires and vacuum line all fished through together
![Image]()
8. Drill a hole in your firewall/driver-side dash area to fish your wires/lines through (note that if you have a wideband you need to drill big enough to fit the pigtail through) now put the grommet in and pull black wire through. you will see a ground tether to the left, you can use this as your ground.
![Image]()
9. Take the upper end of your vacuum line and put the end cap and crush piece on the line, these feel tight but they will fit
![Image]()
10. now put the third piece that screws on to the back on the boost gauge on as well (wrap threads in teflon tape, but be sure not to cover hole)
![Image]()
11. Tighten
![Image]()
12. Slide your pillar into place (unbolted) and pull the light and vacuum line through the space you are installing the gauge, be sure none are kinked or bent
![Image]()
13. Install light in back of boost gauge, as well as the vacuum line, be sure to teflon tape the threads on the back of the gauge
![Image]()
14. Fish you vacuum line through you new hole and place the vacuum connector on the end of the line (appropriately cut)
![Image]()
List of supplies you will need:
1. Boost gauge
2. Light for gauge
3. Vacuum line
4. Vacuum T
5. Vacuum line connector
6. Drill
7. Grommet
8. Black 14 gauge wire
9. White 14 gauge wire
10. Weatherproof butt connectors (for 14 gauge wire)
11. Wire cutters
12. Needle nose pliers
13. Wire strippers
14. Crimping tool
15. Pillar gauge pod
16. Teflon tape
17. Add a fuse connector

1. Remove stock pillar

2. Fish black and white wires through edge of dash, about 4 feet of black and 2 feet of white

3. Put ends of light and new black and white wires in the butt connector and crimp (top side of dash)
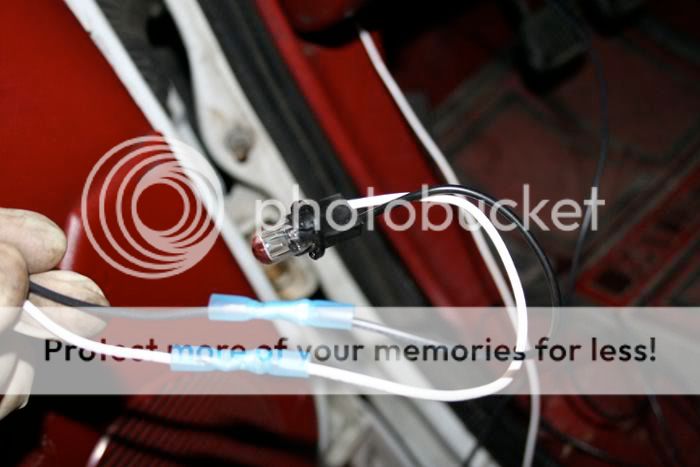
4. Now heat the shrink on the connector for a good seal

5. You can now test you connection with a 9V battery, so if you have an issue later you know that it's not from here. at this point take the white wire, connect with butt connector to the add a fuse connector and place it in a spot that is only on with your ignition or switch or a switch on. i used the headlight switch so the light will work with the dimmer switch (sorry, forgot to take a picture of this)

6. Fish the vacuum line through the dash like you did with the previous wires, but sine the line is in a permanent curl position, it is easier to fish a piece of wire through then tape the ends of the wire and vacuum line together and pull the line through

7. Now you should have the two wires and vacuum line all fished through together

8. Drill a hole in your firewall/driver-side dash area to fish your wires/lines through (note that if you have a wideband you need to drill big enough to fit the pigtail through) now put the grommet in and pull black wire through. you will see a ground tether to the left, you can use this as your ground.

9. Take the upper end of your vacuum line and put the end cap and crush piece on the line, these feel tight but they will fit

10. now put the third piece that screws on to the back on the boost gauge on as well (wrap threads in teflon tape, but be sure not to cover hole)

11. Tighten

12. Slide your pillar into place (unbolted) and pull the light and vacuum line through the space you are installing the gauge, be sure none are kinked or bent

13. Install light in back of boost gauge, as well as the vacuum line, be sure to teflon tape the threads on the back of the gauge

14. Fish you vacuum line through you new hole and place the vacuum connector on the end of the line (appropriately cut)

")


